Wednesday, 19 October 2016

NEW DYNAMICS AX (DYNAMICS 365) NEW USER CREATION

Hello there,

Back with a simple blog on New User Creation in NEW Dynamics AX (Dynamics 365).  Follow the steps below to create a new user account in Azure Active Directory and then add that user to AX7.  

Login to your Azure portal
  • ·       Login to your Azure portal and locate the “Active Directory” Service at the Navigation pane.
  • ·       Create a new directory or Use the existing one.  Here I’m using the existing one called “myactivedirectory.onmicrosoft.com”.
  • ·       Select the existing active directory and select “Users” on the top which will locate the below screen.
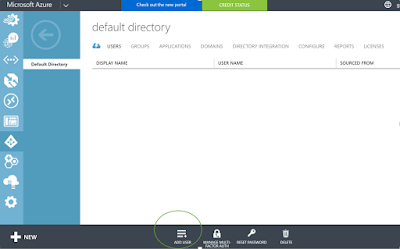

     Click “ADD USER” button at the bottom which will open up the below page.
      Add New User

I leave the Type of User as “New user in your organization” and key in the user name.  Notice that the user account would be like username@myactivedirectory.onmicrosoft.com
Hit the next arrow at the bottom right corner which would take us to the below user profile page.

User Profile

Key-in the additional information.  I keep the Role as User and hit Next which will take us to the Temporary passport creation page.

Temporary Password Creation


Hit Create to create the temporary password.


Copy the temporary password and hit Finish (tick mark).

New User account has been created.


Adding the User to AX7

  • ·       Locate System administration > Users > Users
  • ·       Hit NEW and Key in the below details:
  • ·       User ID:  <user id>
  • ·       User name: <user name>
  • ·       Domain: here, key in the <Azure Active Directory Name>.onmicrosoft.com.  In our case, it is myactivedirectory.onmicrosoft.com
  • ·       Alias:  Here key in the Azure Active Directory user account as username@<activedirectoryname>.onmicrosoft.com.  In our case it is, username@myactivedirectory.onmicrosoft.com. 
  • ·       Company:  Select the Default Company for the user
  • ·       Enabled: Make sure this is enabled and hit SAVE.


Assign Roles
              Once the user is created, necessary roles need to be assigned to the user account.
              Click “Assign roles” button which will open up the below page.


Select the necessary roles and hit OK.

You’re there!

The first time when you login to Dynamics AX, it would prompt you to change your password.

Cheers,
Abdul


Monday, 25 July 2016

AX7 ERROR: "External DLL Name" Unable to load one or more of the requested types. Retrieve the LoaderExceptions property for more information.

Hello there,

At times, we get this kind of error when dealing with the external DLLs within X++.  If you look at the error, it is not much descriptive enough to understand, it says retrieve the LoaderExceptions property for more information.  So, we really need to know what’s inside the LoaderExceptions.  There are many ways to track the LoaderExceptions, a simple debugging would help.  But we were stuck with this error only when the solution is deployed in Azure, but works just fine in the local VM.  The Azure one was only for Demo, so we could not go with the debugging approach here.  Luckily, we do have logging feature where all the errors would get logged into a file. 

First thing first, modify the respective “catch” statement in the DLL codebase to dig deeper and retrieve the LoaderExceptions.

catch (System.Exception ex)
{
      Log(ex.message); //this would log the LoaderExceptions error

      //here is where we go deep and retrieve the details
      if (ex is System.Reflection.ReflectionTypeLoadException)
      {
          var typeLoadException = ex as System.Reflection.ReflectionTypeLoadException;
          var loaderExceptions = typeLoadException.LoaderExceptions;
          foreach (var errorItem in loaderExceptions)
          {
              Log(errorItem.Message);
          }
       }
 }

Now, go run the process, it will show up the error with more details.  This is what we got in our case,

ERROR: Could not load file or assembly <DLL name>, Version=1.0.0.0, Culture=neutral, PublicKeyToken=null' or one of its dependencies. The system cannot find the file specified.

This <DLL name> is not same as what we got in the original error, as we have more DLLs referencing each other in our case, it is little complicated.  But, we ensure that all the DLLs are added as References in the solution model. 

There are some articles that talks about these kind of errors, see the links below:


Just make sure your solution model follows what is specified in the above links.  In our case, it seems like Yes, but still the error does not go awayL

After a little struggle, it is found the problem was with the deployment.  Usually, when you deploy AX7 model, you create a package and deploy using LCS (the first time at least).  The package you create does include the DLLs so thought it may not be required to manually copy over the DLLs to the respective folder in Azure VM.  But it some cases, it is very much required, otherwise, the solution won’t work.  We actually had done that in the local VM!  The LCS automation is what was driving us crazy!

Go to IIS manager > Locate the AOSWeb service > Locate the “bin” folder within > right-click “bin” folder the select “Explore”.  It will take you to the File Explorer and to the respective path.  Typically, the path is “C:\CustomerServiceUnit\Dobind\Packages\Cloud\AosWebApplication\AosWebApplication.csx\roles\AosWeb\approot\bin” in local hosted VM and would be different in Azure hosted ones.  Place your DLLs there and restart AOSWeb service and IIS.  Bingo!  The error goes away and it works just fineJ

Couple of things to note here, this process is not always required for all the external DLLs we consume in our solution.  Perhaps, which is why, Microsoft does not automate this during LCS deployment.  But in certain complex scenarios where we have different DLLs and referencing each other in a complex way, this seems to be required. 


Cheers!

Wednesday, 29 June 2016

NEW DYNAMICS AX Build Error: X++ project cannot be built. Another build is in progress

Hi there,

Just a quick tip here on the Build error.  Have encountered the situation where I could not perform the build neither test the changes I did, the Visual Studio was throwing the above error.  It was a multi-developer environment, thought another developer was actually performing the Build, but that was not the case.  Tried kicking out the other users, restart Visual Studio, still the problem was there.

Then comes the typical way, RESTART the Server (VM) that resolved the issue!  Simple thing, but you could save some time digging the mud which does not yield anything.

Cheers,
Abdul

Friday, 17 June 2016

Manipulating Nested Containers

Hi there,

I am sure all the X++ developers at some point might have come across with a situation to use Container type data, and so do I.  At times, a container type field is required for the table, or required for handling the business logic, etc.  The functions around Containers are also very minimal and easy to use.  Here, I am going to discuss about the Nested containers where the situation demands you to store containers within a container.

For example,
    Simple container:     container c = ["blue", "yellow", "red"];
    Mixed container:      container mixed = ["blue", 10.00, 125, true];
    Nested container:     container nested = [c, mixed];

Say, we have a nested container now and we want to retrieve the values from it.  You may want to write something like below:

int i;
container temp;
;
for (i = 1; i <= conlen(nested); i++)
{
    temp = conpeek(nested, i);
    print con2str(temp);  // you can always loop thru it and retrieve each element
}

Adding values to the container is not always straight forward.  For example, you may not simply assign values to the container like c = ["blue", "yellow", "red"];  instead, you might want to fetch the color information from a different source (may be from a table), and add the elements to the container on the go like below:
        while select Color
         {
                c += Color.Name;
                         OR
                 c = conIns(c, i, Color.Name); 
//initialize i to 1 and increment within the loop for the next position.
          }

Have you ever tried to figure out what is the difference between these two approaches.  When can we use "+=" and when can we use "conIns()".
Generally, X++ developers use "+=" approach, because it is easy to write, no need to manage a counter to identify the position, etc.

What if I tell you "+=" approach won't work in certain situation whereas "conIns()" would.  Yes.  Look at the below code:

What do you think the output of the below program would be:

static void ContainerDemo(Args _args)
{
    container baseContainer;
    container childContainer;    
    int i;
    ;
    
    childContainer = ["Vendor Account", "Customer Account"];
    baseContainer += childContainer;    
    
    childContainer = ["V0001", "C0001"];
    baseContainer += childContainer;            
    
    for (i = 1; i <= conLen(baseContainer); i++)
    {
        childContainer = conPeek(baseContainer, i);
        print con2Str(childContainer);
    }
    
    pause;
    
}

It would print,
Vendor Account,Customer Account
V0001,C0001

WRONG!!!  The above program in AX 2012 R2 would throw a run-time error as below on the line: childContainer = conPeek(baseContainer, i);

Error executing code: Wrong argument types in variable assignment.

What's wrong with that line?  Frankly, it is correct and this is the typical way to retrieve values from the container.  But why this error?

Because the values stored inside the "baseContainer" is also a container or set of containers.  This kind of situation demands the usage of "conIns()". Yes, we need to use "conIns()", and here is the modified code:

static void ContainerDemo(Args _args)
{
    container baseContainer;
    container childContainer;    
    int i;
    ;
    
    childContainer = ["Vendor Account", "Customer Account"];
    baseContainer = conins(baseContainer, 1, childContainer);    
    
    childContainer = ["V0001", "C0001"];
     baseContainer = conins(baseContainer, 2, childContainer);          
    
    for (i = 1; i <= conLen(baseContainer); i++)
    {
        childContainer = conPeek(baseContainer, i);
        print con2Str(childContainer);
    }
    
    pause;
    
}

Here is the output,
Vendor Account,Customer Account
V0001,C0001

This the minor thing but very useful to know.

Cheers,
Abdul


Tuesday, 7 June 2016

Changing Dashboard Banner in NEW DYNAMICS AX (AX7)

Hi there,

Here is one cosmetic stuff - Changing the Banner!

What is Banner in AX7?  It is what you see in the Default Dashboard


Have you ever tried changing this banner to something else specific to your organization?  Yes, it is very much possible.  Also, this banner is Legal Entity specific.  For example, you can have a banner for the legal entity USMF, and a different banner for US01, etc.  And, you guessed it right, we have to make this change at Organization administration > Organizations > Legal entities.

There is a fast tab in Legal entities page called "Images" which will help changing the banners.


Click Edit to change it to Edit mode.
Change the Dashboard Company Image Type to "Banner".
Click "Change" under "DASHBOARD IMAGE" group and browse an image.  The new image will be reflected in the legal entities page.

Refresh the page, and there you go, your new banner will be displayed in the Dashboard on that legal entity.

Note:  I have not seen any limitation on the dimension of the banner.  For example, I tried with my profile picture and is still working but I could just see only my hair :).  

Cheers!

Wednesday, 27 April 2016

Manually Deploying SSRS Reports to NEW Dynamics AX (AX7 Azure Hosted)

Hi there,

Anyone there not liking Automation?  I love it.  However there are times, we need to look back and analyze the manual way of doing things, situation demands at times :).  Deployment is one of them we are going to talk about here!

I'm sure you would have had some experience deploying the application packages, reports, etc., into Local AX7 VM using the PowerShell Cmdlets.  The same approach would still work with Azure Hosted VMs too with little changes.

I was going thru the deployment document where I found the way to redeploy all the reports which also includes your custom reports.  You normally execute this at the end, after the package is successfully deployed,

Here is the PowerShell cmdlet that works with local hosted VM,

  1. Type Set-ExecutionPolicy UnRestricted
  2. Select 'Y' when prompted and hit 'Enter'
  3. Execute this script       command: C:\Packages\Plugins\AxReportVmRoleStartupTask\DeployAllReportsToSSRS.ps1


This works perfectly well with local hosted VM, but not with the Azure Hosted VM.  The problem is, there is no such folder called C:\Packages\ in Azure Hosted VM.

Smartly found the replacement folder for C:\Packages which is J:\AosService\PackagesLocalDirectory (this is case with version 7.0.1265.3015).  And, tried the following:

J:\AosService\PackagesLocalDirectory\Plugins\AxReportVmRoleStartupTask\DeployAllReportsToSSRS.ps1

Did it work?  Well, NO :(.  It was not working either, but throwing the following error:

Get-ItemProperty : Property BinDir does not exist at path 
HKEY_LOCAL_MACHINE\SOFTWARE\Microsoft\Dynamics\Deployment.
At J:\AosService\PackagesLocalDirectory\Plugins\AxReportVmRoleStartupTask
      \DeployAllReportsToSSRS.ps1:64 char:36
+ ... Location = (Get-ItemProperty -Path Registry:HKEY_LOCAL_MACHINE\...
 + CategoryInfo : InvalidArgument: (BinDir:String)

Looked at the specified path at windows registry, there is no such entry for "BinDir" but does exist in local hosted VM.  Creating a new entry in the registry settings does not seem the good idea for me, so dig little deeper and found that BinDir is one of the optional parameters of the PowerShell Script that can be specified along with the command.  

So, modified the PowerShell script to the below resolved the problem and was able to deploy the reports manually!

J:\AosService\PackagesLocalDirectory\Plugins\AxReportVmRoleStartupTask\DeployAllReportsToSSRS.ps1 -PackageInstallLocation "J:\AosService\PackagesLocalDirectory"

Cheers!

Tuesday, 12 April 2016

Deploying NEW Dynamics AX's Custom Data Entities from DEV to TEST instance

G'day everyone,

Talking here about an excellent feature of AX7, the Data Entities.

When we build the data entities in DEV environment and wanted to test if it is working, we just setup the respective object as StartUp object in Visual Studio, enable database synchronization upon build and hit Start to initiate the build and do a quick test.  In the Data management workspace, during import or export, you will get to see your custom data entities listed for selection, and the custom data entities would be available in the Data Entities page too.  No additional configuration or setup is required.

Now, you want to build, create package and deploy the same into the TEST environment.  But, after the deployment, you would not get to see your custom entities listed in the data management import/export neither in Data Entities page.  But the underlying schema would get deployed.  You will need to manually configure the Custom Data Entities at the Entities page first before you use your Data Packages for Import/Export.  You can also think of using Data Connector App to do this quickly.

Cheers!